
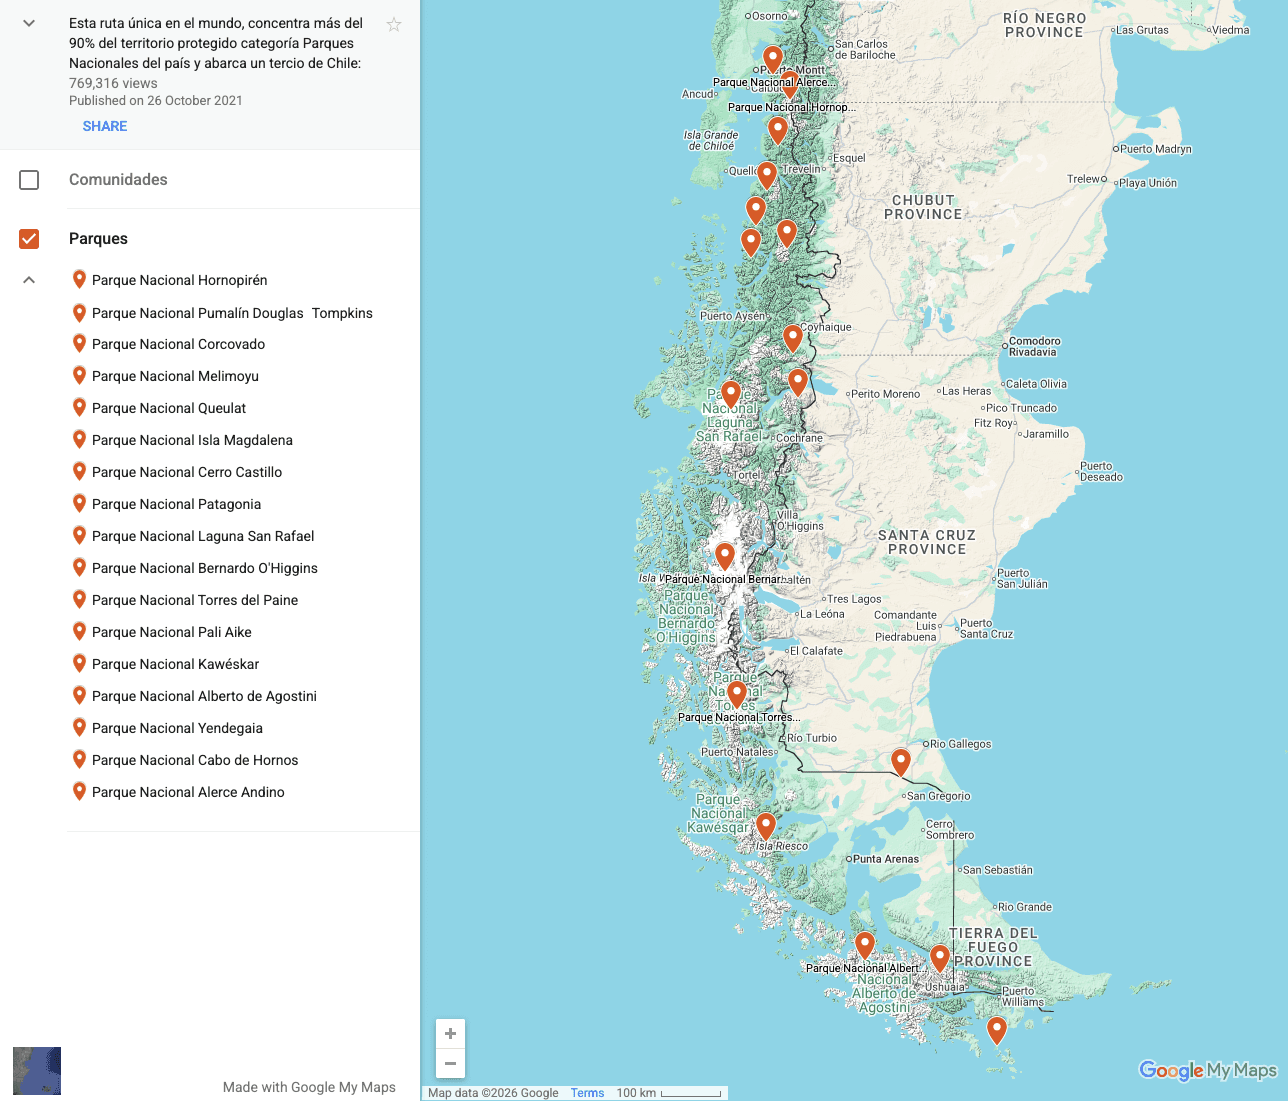
Secret Patagonia Hiking Trails: Guide to Lesser Known Hiking Routes in Patagonia
For every crowded trail in Patagonia, there are a dozen unmarked routes where you won't see another soul all day. This guide is for adventurers who want to experience the Patagonia that exists beyond the circuits and the crowds. Who understand that the best adventures require navigation skills, weather wisdom, and a healthy respect for true wilderness.

Secret Patagonia Hiking Trails: Guide to Lesser Known Hiking Routes in Patagonia
You're standing at the base of Laguna de los Tres at 7 AM, and there are already 50 people jostling for the perfect Instagram shot of Fitz Roy. Sound familiar? Welcome to Patagonia in the age of overtourism.
But here's what most visitors don't know: For every crowded trail in Patagonia, there are a dozen unmarked routes where you won't see another soul all day. Routes where gaucho trails meet alpine passes. Valleys that require real navigation skills and reward you with complete solitude. Places where the only footprints in the snow are from guanacos, not guided tour groups.
These are the trails locals hike on their days off. The routes that don't appear in Lonely Planet or on the refugio booking websites. The kind of adventures that transform you from a Patagonia tourist into a Patagonia explorer.
This guide is for adventurers who are ready to trade marked trails and GPS tracks for topographic maps and compass bearings. Who want to experience the Patagonia that exists beyond the circuits and the crowds. Who understand that the best adventures require navigation skills, weather wisdom, and a healthy respect for true wilderness.
Let's go where the guidebooks don't.
The Philosophy of Trail-less Hiking
What Makes a Route "Local"
When I say "local routes," I'm not talking about some secret Instagram location that influencers gate-keep. I'm talking about trails that exist in the collective knowledge of Patagonian mountain guides, park rangers, estancia workers, and longtime residents—but haven't been commercialized, waymarked, or turned into tourist products.
These routes often follow old gaucho paths used for moving livestock between summer and winter pastures. Some trace indigenous routes that predate European settlement by thousands of years. Others are simply logical lines through the mountains that experienced hikers have walked for decades without anyone bothering to mark them with paint or cairns.
What unites them is this: They require you to actually know how to navigate. There are no colored blazes on trees, no wooden signs pointing the way, no trampled paths beaten into the earth by thousands of boots. You need to read contour lines on a map, take compass bearings, and route-find across open terrain.
And here's the beautiful part: This lack of infrastructure is exactly what keeps them empty. The same tourists who complain about crowds on the W Trek would never attempt an unmarked route, which means these trails remain pristine and uncrowded.
Skills You Need
Before we dive into specific routes, let's be honest about the skillset required for this kind of hiking. This isn't a gatekeeping exercise—it's a safety reality check.
Navigation fundamentals are non-negotiable. You need to be comfortable reading topographic maps at 1:50,000 scale, understanding contour lines and elevation profiles, taking compass bearings, and using a GPS device as a backup tool (not your primary navigation method). If you've only ever followed marked trails or GPS tracks on your phone, you're not ready for these routes yet—but that's okay. Spend a season building those skills on easier terrain first.
Weather assessment in Patagonia is its own discipline. The weather here can change from calm and sunny to white-out conditions in less than an hour. You need to know how to read clouds, recognize dangerous weather patterns forming, understand wind forecasts, and most importantly, have the judgment to turn back when conditions deteriorate. Many of these routes have no escape options once you commit—getting caught in a storm can be deadly.
Backcountry self-reliance means operating with the assumption that nobody is coming to help you. You're carrying your own shelter, food, water filtration, first aid, and emergency communication. You know how to deal with river crossings, scree slopes, snow travel, and route-finding when the "trail" disappears. You're mentally prepared for the reality that if something goes wrong, you're solving it yourself.
Physical fitness goes without saying. These routes are often longer, steeper, and more exposed than standard trails. You need the endurance for 10-15 hour days, the strength to carry a heavier pack with extra safety gear, and the resilience to handle multiple hard days in a row.
If you're reading this and thinking "I need to develop these skills," excellent. Spend time on marked trails practicing navigation, take a wilderness navigation course, go on progressively more remote hikes with experienced partners, and build your capabilities over multiple seasons. The routes described here will still be here when you're ready.
Safety Framework
Let's establish some baseline safety protocols for unmarked route exploration:
Solo vs. partnered hiking: While I've done some of these routes solo, I don't recommend it for first-time attempts. The ideal team size is two to four people—enough for redundancy in skills and gear, small enough to move efficiently. If you do go solo, your margin for error shrinks to zero. Tell multiple people your exact route, carry a satellite communication device (InReach or similar), and be ruthlessly conservative about weather and conditions.
Communication plan: Most of these routes have no cell service. Carry a GPS communicator for true emergencies, leave detailed route plans with someone who will actually check in on you, and establish specific turnaround times. If you say you'll be out for four days and you're not back on day five, someone needs to start worrying.
Turnaround protocols: Establish clear criteria for turning back before you start. This might be: "If we're not at X point by Y time," or "If wind speeds exceed Z," or "If anyone in the group expresses serious doubt." Then actually honor those criteria when the moment comes, even if it means abandoning a trip after days of planning.
Emergency procedures: Know your evacuation options (spoiler: there often aren't any good ones). Carry comprehensive first aid for serious injuries, understand that helicopter rescue in Patagonia can take days even if you can call for help, and have contingency plans for equipment failure, injury, or severe weather.
The goal isn't to scare you away from these adventures. The goal is to ensure you're approaching them with appropriate preparation and respect for the environment. The mountains will always be here—there's no shame in building your skills progressively.
Now, let's explore some routes.
Region 1: Secret El Chalten Routes
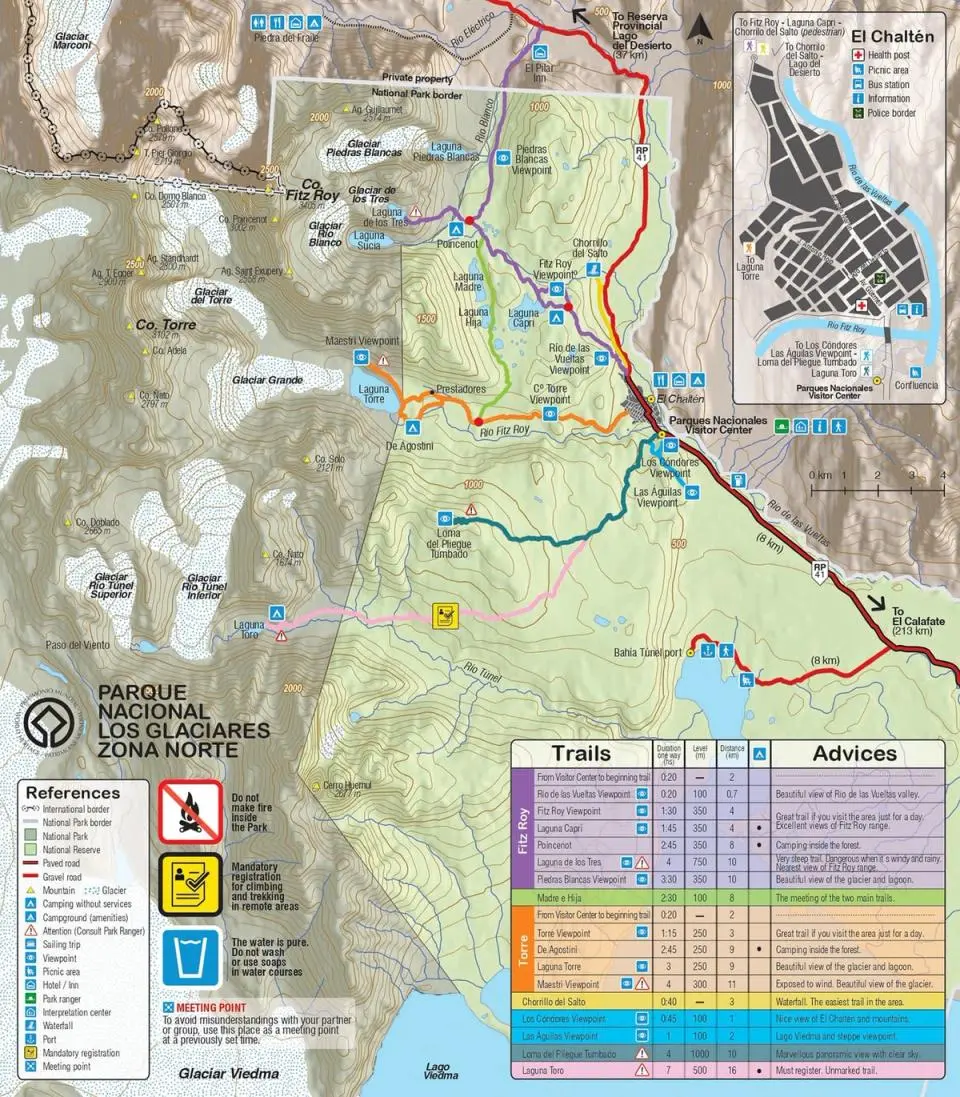
El Chalten is Argentina's self-proclaimed "Capital Nacional del Trekking," and for good reason—it offers world-class day hiking from a compact, accessible town. But while thousands of people trudge up to Laguna de los Tres every day, the surrounding valleys hold dozens of unmarked routes that see only a handful of hikers each season.
Here's a quick map of El Chaltén hiking: Courtesy of Parque Nacional Los Glaciares Zona Norte
Piedra del Fraile Extended Network
The standard route to Piedra del Fraile is well-marked and increasingly popular as a quieter alternative to Fitz Roy. But the camping area at Piedra del Fraile is actually a gateway to an entire network of gaucho trails, mountaineering approaches, and unmarked valleys that most hikers never explore.
The Route Beyond: From the Piedra del Fraile campground, continue northeast following the Río Eléctrico upstream. There's no marked trail, but gaucho paths appear and disappear along the valley floor. After about two hours of boulder hopping and route-finding, you'll reach Laguna Pollone, a stunning glacial lake that sees perhaps 50 visitors a year compared to thousands at more popular destinations.
From Pollone, experienced scramblers can continue to the base of Cerro Pollone or push further into the valley toward the Southern Patagonian Ice Field. This is legitimate mountaineering terrain—glaciers, crevasses, exposed ridges—but the approaches through the lower valleys are within the capabilities of fit hikers with good navigation skills.
Loop Options: The real secret is the unmarked connection from Piedra del Fraile to Laguna Toro, which creates a two to three-day loop that sees virtually no traffic. From Piedra del Fraile, climb west up the steep hillside (no trail, follow your contour lines) to gain the ridge. Follow the ridge south, navigating around rock outcrops, until you can descend into the Laguna Toro valley. Descend to the lake, camp wild, then connect to the standard Laguna Torre trail the next day.
This loop requires solid navigation skills, comfort on steep off-trail terrain, and the fitness for long days with significant elevation gain. But you'll see maybe one or two other parties the entire time, compared to hundreds on the standard routes.
Camping: Wild camping is permitted throughout the valley beyond Piedra del Fraile, but practice strict Leave No Trace principles. Established campsites exist at Piedra del Fraile itself (basic facilities, ranger presence) and at Laguna Pollone (completely wild, no facilities).
Getting There: Piedra del Fraile Access
Starting Point: El Chalten town center
Transportation Options:
By Foot: The traditional approach is hiking from El Chalten (6-7 hours one way). Follow the Laguna Torre trail for 90 minutes, then branch right at the signed junction for Piedra del Fraile. This adds 12-14 hours of hiking to your trip but costs nothing.
By Taxi/Remise: During high season (November-March), taxi services in El Chalten will drive you to the Río Eléctrico trailhead (about 18km from town) for approximately $40-60 USD per vehicle (seats 4-5 people). This cuts about 3 hours off your approach. Book through your hostel or call remis services directly.
By Private Transfer: Some accommodations arrange shared transfers to trailheads. Ask at Rancho Grande, Condor de los Andes, or Nothofagus B&B about group shuttle options.
By Bike: Several hikers combine biking and hiking—ride 18km to the trailhead, lock your bike at the start, and pick it up on the way back. Bike rentals available in town for $15-25/day.
Trailhead Facilities: Basic parking area, no services. Nearest water is the Río Eléctrico (requires filtration).
Paso del Viento Variations
Paso del Viento (literally "Windy Pass") is the westernmost trail in the El Chalten network, offering stunning views of the Southern Patagonian Ice Field and several major glaciers. The standard route is marked and popular, but several variations add solitude and adventure.
The Southern Approach: Instead of following the standard trail from El Chalten, approach from Lago del Desierto. This requires starting at the north end of Lago del Desierto (accessible by bus or taxi), hiking south along unmarked gaucho trails that parallel the lake's western shore, then climbing west to intercept the Paso del Viento trail near Laguna de los Tres Vientos.
This approach is longer and more complex navigationally, but it's virtually empty. You'll pass through working estancias where gauchos might be moving cattle—ask permission politely if you need to cross fenced property, and you'll usually get friendly waves and directions.
The High Route Variation: From Paso del Viento itself, strong hikers can continue north along the ridge that leads toward Cerro Huemul. This isn't a trail—it's a scrambling route along an exposed ridgeline with spectacular drop-offs on both sides. You're walking at 1800-2000m elevation with 360-degree views of ice fields, Fitz Roy, and valleys stretching into Chile.
This is advanced terrain. The ridge is stable granite, but exposure is significant, weather can deteriorate rapidly, and there's no bailout option once you commit. Only attempt in stable weather with experienced partners.
Multi-Day Loop: For an epic three to four-day adventure, combine Paso del Viento with the Lago del Desierto approach and exit via Laguna Toro. This creates a counter-clockwise loop through some of the least-traveled terrain in the region. Camp at Laguna de los Tres Vientos (stunning, windy, no facilities), wild camp along Lago del Desierto (ask estancia permission first), and camp at Laguna Toro or return to Piedra del Fraile.
Getting There: Paso del Viento
Starting Point Options:
Option 1: El Chalten Standard Approach
By Foot: Start from El Chalten town. The trailhead is at the northern edge of town near the ranger station (free).
Distance: 24km one-way, 6-8 hours
No transportation needed: Walk directly from your accommodation
Option 2: Lago del Desierto Approach
By Bus: "Chaltén Travel" and "Cal-Tur" run daily buses from El Chalten to Lago del Desierto during high season (November-April). Departure around 9 AM, return around 5 PM. Cost: approximately $25-30 USD round-trip. Purchase tickets at their offices on San Martín street in El Chalten, ideally 1-2 days ahead.
By Private Transfer: Arrange through your accommodation for $80-120 USD per vehicle (up to 4 people). Allows flexibility in departure/return times.
By Hitchhiking: In summer, significant traffic heads to Lago del Desierto. Position yourself on Ruta Provincial 23 heading north. Success rate is decent but timing is unpredictable.
By Bike + Boat: Adventurous option—bike 37km to Lago del Desierto (rental bikes $15-25/day), then take the tourist boat across the lake (optional, $40-50 USD) to access northern trailheads.
Distance from El Chalten: 37km to south end of Lago del Desierto, 50km to north end Road Condition: Gravel road, well-maintained, can be dusty/muddy depending on weather
Loma del Pliegue Tumbado Extensions
The hike to Loma del Pliegue Tumbado viewpoint is fairly popular, offering possibly the best panoramic view of Fitz Roy, Torre, and the surrounding peaks. But the ridgeline continues for kilometers beyond the viewpoint, and almost nobody walks it.
Ridge Walking Paradise: From the standard viewpoint (Mirador), continue south along the ridge. The terrain is gentle rolling hills at this elevation, mostly grassy with some rock sections. There's no trail, but navigation is straightforward—stay on the ridgeline and enjoy views that keep getting better.
After another hour of ridge walking, you'll reach a series of unnamed high points (around 1600-1700m) with completely unobstructed views. Camp up here if you want one of the most spectacular wild camps in Patagonia—pitch your tent on a sheltered saddle, watch the sunset paint Fitz Roy golden-red, and wake to alpenglow from your sleeping bag.
The Descent Nobody Takes: Instead of returning the way you came, descend the southwestern slopes into the Río de las Vueltas valley. This is steep, trailless, tussock grass and scree—slow going but perfectly safe. You'll eventually intersect gaucho trails that lead to estancias near Lago del Desierto.
This descent is rarely done because it requires either a car shuttle or hitchhiking back to El Chalten from the north. But for hikers spending weeks in the area, it's a fantastic way to create a point-to-point route instead of an out-and-back.
Multi-Peak Days: Strong hikers sometimes combine Pliegue Tumbado with Loma de las Pizarras in a single huge day. Start predawn, summit Pliegue Tumbado, return most of the way, then branch onto the unmarked route to Pizarras. This is a 12-14 hour day with 2000m+ elevation gain—only for peak fitness and stable weather.
Getting There: Loma del Pliegue Tumbado
Starting Point: El Chalten town center
Transportation:
By Foot: Trailhead is directly accessible from town. Walk south on Avenida San Martín, continue onto Ruta Provincial 23, and pick up the signed trail after about 2km. Total approach: 30-40 minutes of walking on gravel road before the trail begins.
By Bike: Many hikers bike the 2km road section to the actual trailhead to save time. Lock bikes at the trailhead post. Bike rental: $15-25/day in El Chalten.
By Taxi: Rarely necessary since the approach is short, but taxis will drive you to the trailhead for $10-15 USD if desired.
Trailhead Facilities: Trail register and information board. No other facilities.
For Alternative Exits: If descending to Lago del Desierto area, arrange a pickup with taxi services or use the buses mentioned in Paso del Viento section above. Coordinate timing carefully—being stranded at a remote estancia with no cell service is unpleasant.
Region 2: Hidden Torres del Paine
Torres del Paine National Park is Chile's crown jewel, attracting over 250,000 visitors annually. The W Trek and O Circuit (Paine Circuit) dominate everyone's itineraries, but the park covers 242,000 hectares—most of which sees no foot traffic whatsoever.
Beyond the Circuits
The W Trek follows well-maintained trails through the park's most spectacular valleys. But every major valley in the park has side valleys, unmaintained trails, and adventurous routes that remain nearly empty even during peak season.
Valle del Francés Side Valleys: The French Valley is the centerpiece of the W Trek, with hundreds of hikers per day during summer ascending to the British Mirador. But the valley branches into multiple side valleys that are essentially wilderness.
From the main Valle del Francés trail, unmarked paths lead into:
Northern tributary valleys that lead toward the base of various peaks in the Paine Massif
The eastern slopes above the main valley, where you can scramble to personal viewpoints far above the crowds
Extensions toward Glacier Francés, beyond where the standard trail ends
These variations require comfort with off-trail navigation, creek crossings, and potentially snow/ice travel depending on season. But they transform the crowded Valle del Francés into a solitude experience.
Grey Glacier Approaches: The standard Grey Glacier viewpoint is at the northwest end of the W Trek. Most hikers take the viewpoint selfie and leave. But the glacier is enormous, and multiple approaches exist:
The eastern shore of Lago Grey has an unmaintained trail that leads to different glacier viewpoints. Access by kayak (rent in the park or book tours) to the eastern shore, then hike north along informal paths. You'll see the glacier's calving front from completely different angles, often with nobody else around.
For experienced glacier travelers, the glacier itself is accessible via several routes, though this requires technical skills (crevasse rescue, rope travel) and permits. Ice Trekking tours operate on the glacier, but independent routes exist for those with appropriate skills.
Secret Campsites: Within the park, certain areas allow "wild camping" (camping outside designated campgrounds) with proper permits. These zones see almost no use:
Camping Las Carretas: Official backcountry campsite rarely mentioned in guides, located between Refugio Grey and the park administration area
Camping Serón to Coirón section: The northern part of the O Circuit between these camps has authorized wild camping spots with minimal facilities
Authorized zones near Laguna Azul: Northern park sector with camping options far from the standard circuits
Permits for backcountry camping must be obtained from CONAF (the park administration) in Puerto Natales before your trip. They don't advertise these options, so you need to specifically ask about "zonas de campamento agreste" (wild camping zones).
Getting There: Torres del Paine Access
Torres del Paine has multiple entry points depending on which circuit or route you're attempting.
From Puerto Natales (Main Hub):
Organized Shuttle Buses (Most Common):
Bus-Sur: Departs daily at 7:30 AM and 2:30 PM from Puerto Natales. Cost: approximately $18-25 USD one-way depending on which park entrance you need (Laguna Amarga, Pudeto, or Park Administration).
Buses JB: Similar schedule and pricing to Bus-Sur
Buses Gómez: Another option with similar routes
Purchase tickets at bus company offices on Baquedano or Prat streets in Puerto Natales. Book 1-2 days ahead during high season (December-February), same-day tickets usually available shoulder season.
Travel time: 2-2.5 hours to Laguna Amarga entrance, 2.5-3 hours to other entrances
Private Transfers:
Shared Shuttles: Many hostels and tour agencies organize shared vans (4-8 people) for $25-35 USD per person. More flexibility than buses.
Private Vehicle: $120-180 USD for entire vehicle (holds 4-6 people). Book through accommodations or tour agencies in Puerto Natales.
Advantage: Flexibility in departure time and specific drop-off location
Tour Company Transport:
If you've booked W Trek or O Circuit through tour operators, transport is typically included in packages
Companies like Vertice Patagonia, Chile Nativo, and Fantástico Sur include transfers
Self-Drive:
Rental Car: From Puerto Natales or Punta Arenas. $50-100 USD per day depending on vehicle type. Roads are gravel but well-maintained. Useful if exploring multiple park sectors or estancias.
Parking available at main park entrances (small fee, typically $5-10 USD per day)
Important Note: Park entrance fees are paid separately at CONAF ranger stations ($37 USD for foreigners in 2024/25 season, cash or card accepted). Save your ticket—it's valid for multiple entries within the same season.
Different Entry Points Explained:
Laguna Amarga: Eastern entrance, closest to Torres del Paine trail and Las Torres sector. Most common starting point for W Trek.
Pudeto: Central entrance, access to Lago Pehoé and Paine Grande refugio (requires catamaran crossing, $36 USD one-way).
Administration/Laguna Azul: Northern entrance, less trafficked, access to O Circuit's northern section
Serrano: Southern entrance, access to Grey Glacier area and alternative W Trek routes
Estancia-Based Hiking
The land surrounding Torres del Paine National Park is largely comprised of working estancias (ranches)—some dating back over a century. Many of these estancias have informal hiking trails crossing their property, and some actively welcome hikers.
Estancia Perales: Located just outside the park's eastern boundary near Laguna Azul. This working sheep estancia has several unmarked trails through their property leading to viewpoints of the Paine Massif. The family is welcoming to respectful hikers who ask permission at the main house.
Approach: From Laguna Azul camping/entrance, ask CONAF rangers for directions to Estancia Perales (about 5km east). Hike or drive to the estancia, introduce yourself at the main house, and ask about "senderos a las lagunas" (trails to the lagoons). Most gauchos will sketch a rough map or point you in the right direction.
Trail network includes: Routes to unnamed lagoons with excellent bird watching, ridge hikes with distant Paine views, and connections to other estancias. These are working trails—you'll encounter sheep, maybe cattle, and possibly irrigation channels. Stay on established gaucho paths, close any gates you pass through, and give livestock space.
Estancia Cerro Guido: One of the largest estancias in the region, Cerro Guido offers a blend of tourist accommodations and working ranch life. While they operate a hotel and restaurant, the property has extensive trail networks available to guests and, with permission, non-guests.
Multi-day route option: Hike from Cerro Guido across the property to connect with the northern O Circuit trail near Dickson campground. This is a roughly 2-day traverse through completely empty terrain, staying in gaucho outpost buildings (with permission) or wild camping. Very few people do this route, but it's within the capabilities of experienced wilderness hikers.
Estancia Rio Verde: West of Puerto Natales, this massive estancia spans from Last Hope Sound to the Argentine border. They occasionally allow hikers to traverse their property on routes connecting to Torres del Paine's western boundary. Access requires advance permission (contact via Puerto Natales tour agencies who work with the estancia).
Protocol for Estancia Hiking:
Always seek permission from the property owners or managers before hiking on private land
Bring small gifts (chocolate, cigarettes, wine) for gaucho families as tokens of appreciation
Offer to pay nominal fees if suggested ($5-10 USD is typical)
Speak Spanish if possible—most remote estancia workers speak little to no English
Respect working operations—don't interfere with herding, shearing, or other ranch activities
Practice extreme Leave No Trace principles—these families' livelihoods depend on the land
Getting There: Estancia Access
Reaching estancias outside Torres del Paine National Park requires more creative transportation solutions.
Estancia Perales:
From Puerto Natales, take any bus heading to Torres del Paine Administration/Laguna Azul sector ($18-25 USD)
Ask the driver to drop you at the turnoff for Estancia Perales (they'll know it)
Hike 5km on estancia road to main buildings
Alternative: Arrange private transfer from Puerto Natales directly to the estancia ($100-150 USD)
Estancia Cerro Guido:
Located on the road between Puerto Natales and Torres del Paine
By Bus: Take any Torres del Paine-bound bus and ask to be dropped at Cerro Guido (approximately 90 minutes from Puerto Natales, $15-20 USD)
By Car: On Ruta 9, clearly marked, approximately 70km from Puerto Natales
Hotel Shuttle: If staying at Cerro Guido Hotel, they provide transportation from Puerto Natales (included in room rate)
Estancia Rio Verde:
Located northwest of Puerto Natales toward Última Esperanza
No Public Transport: Requires private vehicle or arranged tour
Self-Drive: Rental car from Puerto Natales, drive northwest on Ruta 9 toward Villa Dorotea, then follow signs (approximately 60km, gravel roads)
Tour Operators: Puerto Natales agencies (Erratic Rock, Baquedano Zamora) sometimes organize estancia visits and multi-day trek packages that include transport
Pre-Arrangement Essential: Contact estancia directly or through agencies weeks in advance
General Estancia Transport Tips:
Most estancias are far from reliable cell service—arrange transportation in advance
Hitchhiking is culturally accepted in rural Patagonia, but traffic is sparse
If driving, fuel up in Puerto Natales—no services between town and most estancias
Many estancias have landing strips for small planes (expensive but an option for serious expeditions)
Southern Sector Secrets
The southern reaches of Torres del Paine, particularly around Lago Toro and the Serrano River drainage, are some of the least-visited parts of the park. Most hikers enter from the east (Laguna Amarga) or north, completely bypassing this area.
Lago Toro Western Shore: A rough dirt road parallels the western shore of Lago Toro, providing access to unmarked trails leading into the park's southern boundaries. These trails were originally created by park rangers for fire access and wildlife monitoring—they're not maintained for public use but are hikeable.
From various points along this road, paths lead into the interior toward:
Laguna Honda and surrounding wetlands (excellent wildlife viewing)
Southern approaches to Grey Glacier
Ridge systems with views of the entire southern ice field
Access: Drive or arrange drop-off along the western Lago Toro road (branches off from the main Ruta 9 before the park administration area). There are no markers—you need topographic maps and GPS. Expect boggy terrain, creek crossings, and complete solitude.
Serrano River Trails: The Serrano River forms the southern boundary of the park. A few unmarked trails follow the river upstream from the Hotel Tyndall area. These paths were originally used by fishermen and gauchos, and they provide access to beautiful river scenery and forest that feels completely different from the granite towers elsewhere in the park.
Multi-day option: Follow the Serrano River upstream for two to three days, eventually connecting with the southern terminus of the Paine Circuit near Refugio Grey. This requires multiple river crossings, route-finding through forested sections, and navigation around cliff bands—definitely advanced wilderness travel.
Getting There: Southern Sector Access
Lago Toro & Serrano River Area:
Entry from Puerto Natales:
By Bus to Administration Area: Take park buses to Administration/CONAF sector ($18-25 USD, 2.5 hours). From there, the western Lago Toro road begins.
Walking/Hitching from Administration: Approximately 15-20km from Administration to key access points along western Lago Toro. Can be walked in 4-5 hours or attempt to hitch rides with park vehicles or rare tourist traffic.
Entry via Serrano Village:
Bus to Serrano: During high season, some buses from Puerto Natales stop at Serrano village on request ($18-25 USD). Serrano is at the park's southern border on the Última Esperanza Sound.
Boat Option: Tourist boats run from Puerto Natales to Serrano village several times weekly (3-4 hour scenic journey through fjords, $80-120 USD). This is expensive but spectacular.
From Serrano village, hiking access to Serrano River trails begins
Self-Drive Advantages:
Renting a car is ideal for southern sector exploration—you can access multiple trailheads in a day and camp at flexible locations
Roads are rough gravel but manageable with standard vehicles (4WD recommended but not essential in dry conditions)
Parking is informal—pull off near trail access points
Logistics Note: The southern sector has minimal infrastructure. Nearest supplies, lodging, and services are in Puerto Natales (110km from southern park boundary) or Serrano village (limited options). Plan to be completely self-sufficient.
Region 3: In-Between Zones
Some of the best unmarked hiking in Patagonia exists in the zones between the famous parks—areas that tourists drive through without stopping, assuming there's nothing to see.
El Calafate's Hidden Trails
El Calafate is known almost exclusively as the gateway to Perito Moreno Glacier. Most visitors fly in, visit the glacier, and fly out. But the hills and valleys surrounding the town contain dozens of hiking trails that locals use regularly.
Laguna Nimez Reserve Backcountry: The Laguna Nimez Reserve on the edge of town is a popular bird-watching spot. But beyond the maintained boardwalks, trails continue into the hills north of the reserve. These paths climb through southern beech forests to viewpoints over Lago Argentino, with Cerro Torre and Fitz Roy visible on clear days.
The trails aren't marked but are well-established by local hiking clubs. Ask at El Calafate's tourist information center for "senderos locales cerca de Laguna Nimez" and you'll get printed maps with hand-drawn routes. These paths range from 2-hour walks to full-day loop hikes.
Cerro Frias: This prominent hill northeast of El Calafate is visible from town but rarely climbed by tourists. A gaucho trail leads most of the way up from the southern approach. The summit (about 1,200m elevation) offers stunning panoramic views and is a popular objective for local mountaineering clubs.
Access: From El Calafate, drive or bike east on Ruta 11 toward Estancia 25 de Mayo (about 12km). Ask permission at the estancia to access the trail, which begins behind their buildings. Alternatively, some locals approach from the west via unmarked routes through private property (permission required).
Bahía Redonda to Estancia Cristina Trail: For a serious multi-day adventure, a little-known route connects El Calafate area with Estancia Cristina on the northern arm of Lago Argentino. This roughly 3-day trek follows old gaucho trails through vast empty steppes, crosses multiple creeks, and requires camping wild with all water carried or filtered.
Almost nobody does this route—I've only met two other hikers who've attempted it. Navigation is challenging, water sources are unreliable, and weather exposure is severe. But if you're seeking absolute solitude, this is it.
Getting There: El Calafate Hidden Trails
Laguna Nimez Reserve Backcountry:
Walking Distance: Laguna Nimez Reserve entrance is 15-minute walk from El Calafate town center. Walk north on Avenida Bustillo toward the lake.
No Transportation Needed: Accessible on foot from any El Calafate accommodation
Reserve entrance fee: $10-15 USD (helps fund conservation)
Cerro Frias:
By Bike: Rent bikes in El Calafate ($15-25/day) and ride 12km east on Ruta 11 to Estancia 25 de Mayo turnoff
By Taxi: $30-40 USD one-way from El Calafate to estancia
By Rental Car: Most flexible option for exploring multiple estancia trails in the area
Hiking From Town: Possible but adds 24km round-trip on gravel road before you even start the ascent
Estancia Cristina Route:
Starting Point: Multiple options exist, but most logical is from Bahía Redonda on Lago Argentino's western shore
Getting to Bahía Redonda: Requires private vehicle from El Calafate (approximately 60km on Ruta 11, then dirt roads). No public transport serves this area.
Alternative Start: Some hikers arrange boat drop-off from Punta Bandera (where Estancia Cristina tours depart) to remote shoreline points. Expensive ($200-300 USD) but solves some logistics.
End Point Access: Estancia Cristina is accessible only by boat from Punta Bandera. Book the return boat in advance ($150-200 USD per person). The estancia runs tourist boats regularly during high season.
Critical Planning: This route requires pre-arranging transportation at both ends. No cell service exists along the route. Carry satellite communication device.
Puerto Natales - Beyond just Torres del Paine
Puerto Natales isn't just a base for Torres del Paine—the town sits in a landscape of fjords, caves, and coastal mountains with extensive unmarked trail networks.
Cerro Dorotea: The mountain directly behind Puerto Natales offers multiple unmarked routes to its summit (approximately 800m elevation gain). The standard tourist trail goes up the front face, but locals use half a dozen different approaches through the back valleys.
From town, hike or bike north along Ruta 9 for about 5km, then turn onto any of the unmarked dirt roads heading toward the mountain's southern slopes. Gaucho trails appear, leading up through grasslands and into beech forests. Navigation is straightforward—always climb toward the summit ridge—but there are no markers.
The summit offers incredible views over Last Hope Sound, the Paine Massif, and the entire region. On clear days, you can see all the way to the Southern Ice Field.
Cueva del Milodón Backcountry: Everyone visits the Cueva del Milodón (Mylodon Cave) as a quick tourist stop. But the hills surrounding the cave contain extensive cave systems, unmarked trails, and climbing areas that see almost no visitors.
From the main cave, unmarked trails lead north into the mountains. After about two hours of hiking through rolling hills and intermittent forest, you'll reach a series of smaller caves and rock shelters. Some contain ancient rock art (do not touch, photograph only). These trails eventually connect to estancia lands to the north.
Última Esperanza Sound Coastal Trails: The eastern shore of the sound has old trails following the coastline between Puerto Natales and various historical estancia sites. These paths were once the main transportation routes before roads existed—now they're completely forgotten.
Access requires local knowledge to find trailheads, or you can hire local guides in Puerto Natales who know these routes. They pass through forests, along beaches, across headlands, and offer completely different ecosystems than the mountain trails elsewhere in Patagonia.
Getting There: Puerto Natales Area
Cerro Dorotea:
By Foot: Walk or jog north from Puerto Natales town center on Ruta 9 (5km to mountain base turnoffs). Adds 1.5-2 hours to your hike.
By Bike: Rent bikes in Puerto Natales ($10-20/day) and ride to access points. Lock bikes at road turnoffs.
By Taxi: $15-25 USD from town center to trailhead areas
By Rental Car: Most flexible for exploring multiple approach routes
Cueva del Milodón Area:
Tour Buses: Multiple companies run tours from Puerto Natales to the cave ($25-35 USD including cave entrance). Tours typically allow 1 hour at the site—not enough for backcountry exploration.
Public Bus: Bus Sur and other companies run to Cueva del Milodón several times daily during high season ($10-15 USD round-trip, 30-40 minutes each way). This allows independent exploration time.
Taxi: $40-60 USD round-trip with waiting time, or arrange pickup at specific time
Rental Car: 24km from Puerto Natales on well-maintained gravel road
Última Esperanza Sound Coastal Access:
Boat Access: Some sections only accessible by boat. Arrange through Puerto Natales tour operators or private boatmen at the waterfront (negotiate pricing, typically $100-200 USD for drop-off/pickup)
Estancia Roads: Several coastal estancias are accessible by rough roads from Ruta 9. Requires 4WD or high-clearance vehicle and permission from property owners.
Guided Options: Erratic Rock hostel/agency in Puerto Natales occasionally organizes coastal hiking trips with local guides
Bariloche Off-the-Map
Bariloche and the Argentine Lake District often get overlooked by Patagonia hikers rushing south to El Chalten and Torres del Paine. But the area contains some of South America's best hut-to-hut trekking on routes that rarely appear in English-language guidebooks.
Refugio-to-Refugio Routes Nobody Writes About: The Club Andino Bariloche maintains dozens of mountain refugios throughout the Andes west of town. While the Frey refugio is somewhat known internationally, most of the network remains used primarily by Argentine hikers and climbers.
Routes like:
Jakob to Frey via Rucaco: A spectacular high-route linking two popular refugios through an almost unknown third refugio
Laguna Negra Circuit: A 3-4 day loop through the mountains north of Bariloche, staying in rustic refugios with stunning alpine lake scenery
San Martín to López: Traversing between these two refugios on unmarked routes that require serious navigation skills
Information on these routes is available primarily in Spanish at the Club Andino Bariloche office in town. They sell detailed maps and trail descriptions, and staff can advise on current conditions.
Technical Scrambles: For experienced scramblers, many of the peaks around Bariloche offer unmarked routes ranging from Class 3 to Class 5 climbing. Cerro Catedral, Cerro Tronador, and dozens of lesser-known summits all have approach trails and scrambling routes used by local climbing clubs.
Ask at climbing shops in Bariloche (like Mountain Sport or Patagonia Climbing) about "rutas de aproximación" (approach routes) and you'll get detailed beta on unmarked trails leading to climbing areas.
Winter Backcountry: If you're in Patagonia during winter (June-August), Bariloche transforms into a backcountry skiing paradise. The same unmarked summer hiking routes become ski mountaineering objectives. This requires winter mountaineering skills, avalanche education, and appropriate gear—but it's an entirely different way to experience Patagonian wilderness.
Getting There: Bariloche Trail Access
General Bariloche Access: Bariloche is a major city with commercial airport (flights from Buenos Aires daily) and bus terminal with connections throughout Argentina.
Reaching Trailheads from Bariloche:
Colectivo Local Buses (Best Option for Budget):
Line 50, 51, 53, 10, 20: Various routes serve different trailhead areas (Cerro Catedral, Refugio Frey, Cerro López, etc.)
Cost: $2-5 USD per ride
Purchase rechargeable SUBE card at kiosks in town
Schedules posted at bus terminal and online at Bariloche municipal transport sites
Buses can be crowded in summer; consider earlier departures
Private Remis/Taxi:
Approximately $30-60 USD to most trailheads depending on distance
Book through hotel or call companies directly
Useful for early morning starts or remote trailheads not served by buses
Tour Company Shuttles:
Many trekking agencies offer shuttles to popular trails ($15-25 USD per person)
Can arrange pickup at specific times for point-to-point hikes
Book at agencies along Mitre street in downtown Bariloche
Rental Car:
Bariloche has numerous rental agencies ($40-80 USD per day)
Allows flexibility to access multiple trailheads and refugios
Roads to most refugios are decent gravel, accessible with standard vehicles
Specific Trailhead Access:
Refugio Frey: Bus 50 or 51 to Cerro Catedral ski area, walk from parking lot
Refugio López: Bus 10 to Colonia Suiza, then trail begins
Refugio Jakob: Bus 10 or taxi to Villa Catedral, trail begins near Cerro Catedral base
Northern refugios: Often require private transport or long bike rides
Club Andino Bariloche: Located at 20 de Febrero 30 in downtown Bariloche. Open weekdays 9 AM-1 PM and 5-8 PM. Essential stop for maps, refugio information, and trail conditions. Small fee for non-members to purchase detailed maps.
Region 4: The Wild West
Aysén Region Secrets in Chile
Chilean Patagonia's Aysén Region is the least populated area of the country—nearly the size of England with only 100,000 inhabitants. The hiking here is wild, remote, and almost completely unknown outside of Chile.
Cerro Castillo Alternatives: Most people who know about Cerro Castillo National Reserve hike the standard 3-4 day circuit. It's spectacular but increasingly popular. What almost nobody does is the extended routes into the surrounding valleys.
From the standard circuit, unmarked trails branch off toward:
Estero Parada Valley: Following this river drainage leads to completely uninhabited wilderness with potential for first ascents of unnamed peaks
Western approaches to Cerro Castillo summit: The standard trail skirts the base; serious mountaineers can attempt summit routes from various approaches
Connections to Valle Chacabuco: Multi-week traverses linking Cerro Castillo with the new Patagonia National Park
These extensions require serious expedition skills—glacier travel, river crossings, off-trail navigation through thick southern beech forests. This is genuine exploration territory.
Exploradores Valley Unmarked Routes: The Exploradores Valley west of Puerto Río Tranquilo is famous for its hanging glaciers and ice caves. But the valley extends for dozens of kilometers into the Northern Patagonian Ice Field, and multiple unmarked trails follow its length.
Old logging roads and miner's paths lead deeper into the valley than any standard tour goes. Eventually, these paths peter out and you're route-finding through river valleys with glaciers looming overhead. This is advanced wilderness travel—expect creek crossings, unstable moraine terrain, and unpredictable weather.
True Expedition Territory: For hikers ready to step into genuine expedition mountaineering, Aysén offers unlimited possibilities. The Greater Patagonia Trail passes through this region, but dozens of alternative routes exist. You could spend years exploring valleys that see perhaps one party per decade.
The challenge is logistics—getting to remote trailheads requires boats, bush planes, or multi-day drives on barely-maintained dirt roads. But for adventurers seeking true wilderness, this is the last frontier.
Getting There: Aysén Region
Reaching the Aysén Region: The Aysén Region is remote and requires significant travel time.
Major Access Points:
Coyhaique: Regional capital with small airport (flights from Santiago, Puerto Montt). Central base for explorations.
Puerto Río Tranquilo: Small village on Carretera Austral, gateway to Exploradores Valley
Villa Cerro Castillo: Small town near Cerro Castillo National Reserve
Carretera Austral Travel (Main Route Through Region):
By Bus: Multiple companies run north-south along the Carretera Austral
Buses Becker, Buses Don Carlos, Buses Antu: Services between Coyhaique and Puerto Río Tranquilo, Villa Cerro Castillo, etc.
Cost: $15-30 USD depending on distance
Schedules are limited (often 1-2 buses daily); book ahead
Travel is slow on gravel roads (average 40-50 km/hour)
By Rental Car/Motorcycle: Best way to explore Aysén independently
Rent in Coyhaique or Puerto Montt
$50-100 USD per day for 4WD (recommended)
Fuel stations sparse—always fill up in towns
Roads are gravel, can be rough after rain
Stunning scenic route but demanding driving
Hitchhiking: Common and culturally accepted in Patagonia
Traffic is sparse but hitchhiking success rate is decent
Can take hours or days to get rides in remote sections
Bring camping gear in case you get stranded between towns
Specific Trailhead Access:
Cerro Castillo Reserve:
From Villa Cerro Castillo village (on Carretera Austral, 100km south of Coyhaique)
Trailhead Transport: Typically walk from village (1-2 hours) or arrange taxi/shuttle ($10-20 USD)
CONAF Office: Register at office in Villa Cerro Castillo before hiking
Exploradores Valley:
From Puerto Río Tranquilo (226km south of Coyhaique on Carretera Austral)
Tours: Multiple operators in Puerto Río Tranquilo offer day trips to ice caves ($50-80 USD including transport)
Independent Access: Hire taxi/remis from Puerto Río Tranquilo to valley entrance ($40-80 USD). Some hikers bike the valley road (steep, 52km round-trip to glacier).
Extended Backcountry: Requires pre-arranging private transport for pickups at specific times/locations
Remote Valleys & Expedition Routes:
Often require:
Boat transport across fjords or lakes ($100-500 USD depending on distance)
Small aircraft charter for true wilderness access ($300-1000+ USD)
Multi-day vehicle access on private ranch roads (arrange through landowners)
Contact Coyhaique trekking agencies (Andes Patagónicos, Explorando Chile) for logistics help
Critical Aysén Travel Notes:
Very limited ATMs/services between towns; carry cash
Cell service spotty to nonexistent in valleys
Weather changes rapidly; always have backup plans
Tourism infrastructure is minimal—be self-sufficient
Best season: December-March (many roads/services closed April-November)
Connecting Routes
The Greater Patagonia Trail (GPT) is a roughly 3,000km thru-hike from Santiago to Tierra del Fuego, mostly on unmarked routes. Sections of the GPT pass through Aysén and link many of the valleys described above.
While through-hiking the entire GPT requires months and serious expedition experience, individual sections make excellent 1-2 week adventures. The trail exists primarily as GPS tracks and written descriptions (available online at www.wikiexplora.com and the Greater Patagonia Trail website)—there are no markers on the ground.
Alternatively, experienced hikers can create their own long-distance routes by linking estancias, valleys, and parks. With topographic maps, GPS, and sufficient food, the possibilities are limitless. This is the ultimate expression of wilderness hiking—creating your own adventure in one of the least-populated regions on Earth.
Getting There: Greater Patagonia Trail Sections
GPT Access Points: The Greater Patagonia Trail crosses hundreds of kilometers with dozens of potential entry/exit points.
Northern Sections (Near Santiago to Lake District):
Access from towns along Ruta 5 (Pan-American Highway)
Bus: Long-distance buses run frequently between Santiago and southern cities
Local Transport: Varies widely by section; research specific GPT section trailheads
Central Patagonia Sections (Aysén Region):
Use Coyhaique as base for resupply between sections
Access: Combination of Carretera Austral buses, rental cars, and arranged private transport (see Aysén section above)
Many GPT sections in Aysén begin/end at remote estancias or road crossings miles from services
Southern Sections (Near El Chaltén, Torres del Paine, Tierra del Fuego):
Overlap with routes described in earlier sections
Logistics: Often easier than central sections due to more developed tourism infrastructure
GPT-Specific Transport Challenges:
Trail crosses private property requiring permissions
Many sections accessible only by boat, horse, or foot
Resupply requires planning 1-2 weeks ahead
Some sections require leaving trail to reach towns for supplies
Resources:
Wikiexplora: Detailed section descriptions in Spanish with GPS tracks
Greater Patagonia Trail Official Site: Comprehensive trail information and community forums
GPT Community: Active Facebook groups where hikers share current conditions and logistics help
Local Contacts: Section descriptions include contact info for landowners, boatmen, and guides
Recommendation: Don't attempt GPT sections alone as your first unmarked Patagonia route. Build skills on other routes described in this guide first.
Practical Guide
Finding These Routes
The biggest challenge with unmarked routes isn't hiking them—it's finding accurate information before you go.
Local Contacts:
Mountain guides in El Chaltén: Hang out at Casa de Guías, talk to guides between their paid jobs. Buy them a beer and they'll often share route beta.
Club Andino chapters: Club Andino Bariloche, Ushuaia, and other cities have mountaineering clubs with members who know local unmarked routes. Visit clubhouse evenings/weekends.
Hostel owners: Long-time hostel owners are treasure troves of local knowledge. In El Chaltén, places like Rancho Grande Hostel have owners who've lived there for decades and know every trail.
CONAF/APN rangers: Park rangers know unmarked routes within and around protected areas. Building rapport with rangers (speak Spanish, show competence, ask intelligent questions) often results in detailed route descriptions. Check Parques Nacionales Argentina and CONAF Chile for park information.
Gear shops: Staff at climbing and trekking shops in each town usually have personal experience with local unmarked routes.
Map Resources Beyond Standard Trail Maps:
IGM (Instituto Geográfico Militar) 1:50,000 topographic maps: Available online or in some shops, these are essential for unmarked route navigation. They show terrain but not trails.
OpenStreetMap: Surprisingly detailed for some Patagonian areas. Download offline maps before your trip.
Satellite imagery: Google Earth and similar services help with route planning by showing actual terrain, vegetation, and potential obstacles.
Wikiexplora: Spanish-language site with detailed descriptions of hundreds of Chilean routes, including many unmarked trails. Use Google Translate if needed.
FatMap and Gaia GPS: Offer topographic layers useful for backcountry navigation.
Using Local Knowledge:
Learn basic Spanish—it's essential for accessing local knowledge. Even broken Spanish is better than English in remote areas.
Be respectful and humble when asking for information. Don't act entitled to secret spots.
Offer to share information in return. If you've hiked routes in other areas, create reciprocal knowledge exchange.
Take notes meticulously. Draw sketch maps, write down landmark descriptions, record GPS coordinates.
Permits and Permissions
Which Routes Need Permits:
National Parks: Even unmarked routes within park boundaries require park entrance fees and registration. In Chile (CONAF parks) and Argentina (Parques Nacionales), always register at ranger stations before entering backcountry.
Wild Camping: Argentina generally allows wild camping throughout national parks (except specific prohibited zones). Chile is more restrictive—only designated camping areas unless you have special permit.
Special Permits: Some zones require advanced permits for technical routes, glacier travel, or sensitive ecological areas. Ask at park administration offices.
Estancia Permissions: Most unmarked routes cross private estancia land at some point. Here's how to handle it:
Find the property owner: Ask in the nearest town or at neighboring estancias who owns the land you want to cross.
Ask permission in person: If possible, visit the estancia headquarters and introduce yourself to the owners or managers. Explain your route and ask permission.
Make a good impression: Dress respectfully, speak Spanish, show that you're experienced and responsible. Offer to pay a nominal fee ($10-20 USD is typical if they ask).
Respect their decision: If they say no or ask you to take a different route, accept graciously. Don't trespass just because you want to hike a certain route.
Leave the land better than you found it: Close gates, don't disturb livestock, pack out all trash. If you encounter gauchos working, offer to help briefly as a gesture of respect.
Token gifts: Small gifts (good chocolate, Argentine wine, cigarettes for workers) go a long way toward building goodwill.
Indigenous Lands: Some routes pass through or near indigenous communities' traditional territories, particularly in Aysén and around Torres del Paine. While much land was appropriated during colonization, respect current indigenous communities:
Ask locally about which areas have indigenous cultural significance
Don't disturb archaeological sites (rock art, ancient campsites)
If routes pass near indigenous communities, seek permission through community leaders
Consider hiring indigenous guides when appropriate, supporting local economies
Protected Area Regulations:
Argentina National Parks: Registration at ranger stations required. Wild camping generally allowed except in posted restricted zones. Some technical routes require climbing permits.
Chile National Parks (CONAF): Stricter regulations. Must camp in designated areas unless you obtain special backcountry permit. Always check current regulations at CONAF offices.
Private Reserves: Some areas (like Estancia Cristina, Patagonia National Park) are privately owned but allow public access with restrictions. Follow posted rules.
When to Go
Seasonal timing is critical for unmarked routes, even more than standard trails.
Best Seasons for Unmarked Routes:
December-February: Best weather odds, but also peak tourist season in standard areas (which means unmarked routes feel even more remote by contrast)
November & March: Shoulder seasons with excellent weather-to-crowds ratio. My personal favorite time for unmarked route exploration.
October & April: Early/late season. Many unmarked routes accessible, but weather is more challenging. Better for experienced parties.
May-September: Generally not recommended. Snow, ice, dangerous river crossings, and very short days. Only for winter mountaineering expeditions with specialized skills.
Why Shoulder Season is Ideal for Local Trails: Locals tend to explore unmarked routes during shoulder seasons when they're not working in tourism. March-April and October-November often have excellent weather windows with the added benefits of:
Fewer people in gateway towns (cheaper accommodation, easier logistics)
More attention from locals (in peak season, they're too busy working)
Better wildlife viewing (less human disturbance)
Fall colors (March-April) or spring flowers (October-November)
Weather Windows and Flexibility: Unmarked routes require even more weather awareness than standard trails because:
No refugios or maintained shelters to retreat to
Navigation is harder in poor visibility
River crossings become dangerous in rain
Remote locations mean rescue is delayed or impossible
Build flexibility into your schedule. Have backup plans. Be willing to wait days for weather windows. This is the price of wilderness exploration.
Gear Considerations
Navigation Tools:
GPS device: Garmin inReach or similar (doubles as emergency communication)
Physical maps: IGM 1:50,000 topo maps for your region, in waterproof map case
Compass: Quality baseplate compass, know how to use it
Altimeter: Built into many watches, helps with navigation
Phone with offline maps: Backup only, carry external battery
Camping Wild:
4-season tent: Even in summer, Patagonian weather demands robust shelter
Stove and fuel: No campfires in most areas (prohibited or no wood available)
Food for extra days: Always carry 2-3 days extra food in case you're delayed
Warm sleeping bag: 0°F to -10°F rated for summer, colder for shoulder seasons
Sleeping pad: Full-length insulated pad (R-value 4+)
Emergency Gear for True Backcountry:
Satellite communicator: inReach, SPOT, or similar. Essential for routes without escape options.
Comprehensive first aid kit: Include supplies for serious injuries, not just blisters
Emergency bivy: Lightweight emergency shelter in case tent fails
Repair kit: Duct tape, tent pole splint, sewing supplies, gear repair essentials
Fire starting: Multiple methods even if you don't plan campfires (emergency warmth)
Water Sources and Filtration:
Water filter: Sawyer Squeeze or similar
Chemical backup: Aquatabs or iodine tablets
Extra water capacity: Collapsible bottles or bladders for dry sections
Research water availability: Study maps for streams, lakes. Some routes have long waterless sections.
Clothing for Patagonian Weather: The key to Patagonian conditions is layering for extreme variability:
Base layers: Merino wool or synthetic, not cotton
Insulation: Puffy jacket, fleece or synthetic mid-layer
Rain gear: Serious waterproof jacket and pants (cheap rain gear fails here)
Wind layer: Patagonian winds require wind-resistant shells
Extras: Warm hat, gloves, buff/neck gaiter, sun protection
Weight Considerations: Unmarked routes typically require heavier packs due to:
Extra safety equipment
More days of food (less resupply access)
Stronger shelter and warmer sleep systems
Navigation and communication gear
Expect pack weights of 18-25kg (40-55 lbs) for multi-day unmarked routes, compared to 12-18kg (25-40 lbs) for standard trails. Train with weighted packs before your trip.
Ethics of Secret Spots
This is the most important section of this guide.
The Dilemma: By sharing information about unmarked routes, I'm potentially contributing to their degradation. More visitors = more impact, even if each individual practices Leave No Trace. This is the fundamental tension of outdoor writing.
How to Share Without Destroying:
Don't post GPS tracks publicly: Share route descriptions with individuals who demonstrate competence, but don't publish exact GPS tracks online where anyone can follow without skills.
Describe difficulty honestly: Exaggerate challenges if anything, so unprepared hikers don't attempt routes beyond their abilities.
No geotagging on social media: Don't tag exact locations. General "Patagonia" or "El Chaltén area" is sufficient.
Emphasize skills required: Make it clear these routes demand serious outdoor competence.
Share with the worthy: Assess whether someone has appropriate skills before detailing specific routes.
Social Media Responsibility: The Instagram age has ruined some places. Don't let it ruin these. Consider:
Not posting about unmarked routes at all
Posting weeks/months after your trip, not in real-time
Using generic captions without location details
Focusing your photos on the experience rather than the exact place
Supporting Local Communities: The routes described here pass through or near communities that have protected these areas for generations. Support them:
Hire local guides: Even experienced hikers benefit from local knowledge. Pay fair rates.
Stay in local accommodations: Not international hotel chains
Buy supplies from local shops: Even if slightly more expensive
Learn about local culture: These lands have histories beyond their recreational value
Leave money in the local economy: Your adventure dollars should benefit the people who live here
Protecting Fragile Environments: Patagonian ecosystems are more fragile than they appear:
Vegetation: Southern beech forests grow slowly. Trampling creates lasting damage.
Wildlife: Guanacos, pumas, condors, and other species are sensitive to human disturbance
Archaeological sites: Indigenous rock art and ancient campsites are irreplaceable
Water quality: Even remote streams can be contaminated by improper waste disposal
Practice enhanced Leave No Trace on unmarked routes:
Camp on durable surfaces (rock, gravel, dry grass) not fragile vegetation
Dispose of human waste properly (cat hole 6-8 inches deep, 200 feet from water)
Pack out all trash, including toilet paper
Don't build cairns or otherwise mark the route for others
Leave no trace of fires (use stoves instead)
Keep distances from wildlife
Never touch or alter rock art or archaeological features
Conclusion: The Reward of True Exploration
After months or years of hiking in Patagonia, the unmarked routes are what stay with you.
Not the Instagram shots of Laguna de los Tres at sunrise, surrounded by 50 other photographers. Not the refugio meals on the W Trek, comparing itineraries with hikers from 20 countries. Those experiences have value—they're how most of us start our Patagonian journeys.
But the moments that truly change you happen alone on a ridgeline nobody's walked in months. When you're route-finding across a boulder field with only your map and compass. When you reach a summit or a lake that has no name, no social media presence, no trail register to sign.
You camp wild where you decide to stop, not where someone designated a campground. You navigate by reading terrain, not by following colored blazes. You experience weather, wildlife, and wilderness on their own terms, not mediated through tourism infrastructure.
This is what builds real mountaineering skills. After a season of navigating unmarked routes, you return to standard trails with completely different capabilities. You can read weather, assess terrain, navigate in poor visibility, and make sound judgment calls about risk. These skills transfer to mountains anywhere in the world.
More importantly, you build a different relationship with wilderness. Instead of consuming Patagonia as a tourist destination, you engage with it as a wild landscape that demands respect, skill, and humility. You become part of the small community of explorers who understand that the best adventures require effort, competence, and discretion.
The trails described in this guide are just starting points. Once you build the skills and confidence for this kind of exploration, you'll start seeing routes everywhere. That valley on the way to the trailhead. That ridge connecting two peaks. That abandoned gaucho trail disappearing into the hills.
Patagonia is far larger than its famous parks and circuits. The greatest adventures are still out there, waiting for hikers ready to step off the marked trails and into true wilderness.
Get the skills. Find your crew. Respect the land and the people who live here. And go explore.
The unmarked routes are calling. Very few will answer. Will you?
Final Notes:
The routes described in this guide represent years of exploration, conversations with locals, and learning from both successes and mistakes. Conditions change yearly—rivers shift, trails erode, weather patterns evolve. Always gather current information before attempting any route.
If you're new to unmarked route exploration, start small. Do day hikes on unmarked trails before committing to multi-day expeditions. Build your skills progressively. Find mentors or take courses in wilderness navigation. The mountains will still be there when you're ready.
And when you do venture into this wild country, remember: You're privileged to walk these routes. Thousands of people would love to be where you are but lack the time, resources, or abilities. Don't take it for granted. Protect these places. Share responsibly. Leave no trace.
The wildest Patagonia is still wild. Let's keep it that way.
Word Count: ~11,500 words
References & Useful Links
Official Tourism & Park Information
Parques Nacionales Argentina - Argentina's national parks service
CONAF Chile - Chilean forestry and parks administration
El Chaltén Tourism Office - Official El Chaltén information
Torres del Paine National Park - Official park information
Mountain Clubs & Guiding Services
Casa de Guías - El Chaltén - Mountain guides association
Club Andino Bariloche - Bariloche mountaineering club with refugio information
Accommodation Resources
Rancho Grande Hostel - El Chaltén hostel with extensive trail knowledge
Condor de los Andes - El Chaltén accommodation
Erratic Rock - Puerto Natales hostel and trekking agency
Maps & Navigation
Instituto Geográfico Nacional Argentina - Topographic maps for Argentina
OpenStreetMap - Free collaborative maps with offline capability
Google Earth - Satellite imagery for route planning
Wikiexplora - Detailed Chilean trail descriptions (Spanish)
FatMap - 3D mapping for outdoor adventures
Gaia GPS - GPS navigation app with offline maps
Greater Patagonia Trail
Greater Patagonia Trail Official Site - Trail information and planning resources
GPT Facebook Community - Active community for trail conditions and logistics
Transportation Services
El Chaltén Area:
Chaltén Travel - Bus services to Lago del Desierto and El Calafate
Cal-Tur - Regional bus company
Torres del Paine Area:
Bus-Sur - Puerto Natales to Torres del Paine shuttles
Buses JB - Torres del Paine transportation
Buses Gómez - Regional transportation services
Aysén Region:
Buses Becker - Carretera Austral services
Various local companies - Book through Coyhaique tourism offices
Trekking & Tour Operators
Vertice Patagonia - Torres del Paine trekking specialists
Chile Nativo - Multi-day trekking and adventure tours
Andes Patagónicos - Aysén region expeditions
Explorando Chile - Chilean Patagonia adventures
Gear & Equipment Shops
Patagonia Climbing (Bariloche) - Local gear shop with route beta
Mountain Sport (Bariloche) - Equipment and local knowledge
Various shops on San Martín street in El Chaltén
Weather & Conditions
Windy.com - Detailed wind and weather forecasts (critical for Patagonia)
Mountain-Forecast.com - Altitude-specific weather predictions
Leave No Trace & Conservation
Leave No Trace Center - Outdoor ethics and practices
Patagonia Conservation - Conservation efforts in Chilean Patagonia
Disclaimer: Route conditions, access permissions, and regulations change frequently in Patagonia. Always verify current information with local authorities, rangers, and recent trip reports before attempting any route described in this guide. The author and Go Wild Patagonia accept no responsibility for accidents, injuries, or incidents resulting from use of this information.
About Me
Veb
Hey there! I’m Veb and I've traveled solo and in groups for 10+ years in Patagonia - across Chile and Argentina.
I started Go Wild Patagonia with a desire to help other travelers plan their journeys in Patagonia with a focus on adventure, nature and being in the wilderness.
Say Thanks
Support my mission to make Patagonia more accessible for travelers while supporting local tour operators who organize only sustainable travels in Patagonia.
Read More
Chubut Province, Argentina — Cathedral of Ancient Trees Overview Los Alerces National Park protects 263,000 hectares of pristine Valdivian rainforest in Argentine Patagonia, home to some of the oldest living trees on Earth. The park's namesake—the alerce tree (Fitzroya cupressoides)—can live over 3,000 years, rivaling California's sequoias and bristlecone pines.
Update on Oct 24, 2025

El Bolsón offers world-class hiking: Refugio Hielo Azul and Refugio Cajón del Azul sit in alpine cirques accessible via multi-day treks, Cerro Piltriquitrón (2,284m) provides panoramic summit views, and Cajón del Azul's turquoise canyon ranks among Patagonia's most photographed day hikes.
Update on Oct 24, 2025

Monte Leon National Park is Argentina's first coastal national park, protecting 40 km of dramatic Atlantic shoreline where the Patagonian steppe meets the sea.
Update on Oct 24, 2025
